Android build commnds
~$ . build/envsetup.sh
~$ lunch sdk-eng
~$ make
The building system will fire up, looking for all those modules and Android.mk files to include into the build process and perform the compilation.
With this extra parameter, the build system will print all GCC compilation logs and all javaccompilation logs, to give you as much information as possible during the building process.
Building a module
Cleaning a module
Cleaning everything
Listing modules
This command shows the list of every module available in the AOSP architecture. The amount of available modules is massive: we will have to wait for a few seconds to see any output from this command.
This command recreates the system images, based on the current status of the source base, using an incremental building approach
If everything is working, you might like to inject your brand new module into your Android system image.
Building tools
The following command will create and provide us with two of the most important tools for an Android expert—adb and fastboot:
The LOCAL_ variables
When it comes to LOCAL_ variables, we can customize our module according to this list:
- LOCAL_PATH: This specifies the path of the module. Usually, the value is retrieved using the $(call my-dir) function.
- LOCAL_MODULE: This specifies the name of the module and, if we are dealing with an executable module, the name of the executable.
- LOCAL_MODULE_CLASS: This specifies the class the module belongs to. Based on its class, every result of the module building process will be placed in the proper folder. The examples of possible classes are EXECUTABLE, ETC, SHARED_LIBRARY, STATIC_LIBRARY, and APPS.
- LOCAL_SRC_FILES: This specifies the list of all source files contained in the module, separated by whitespace.
- LOCAL_PACKAGE_NAME: This specifies the name of the app, for instance: Contacts, Phone, Calculator, and so on.
- LOCAL_SHARED_LIBRARIES: This specifies the shared libraries that may be required.
- LOCAL_MODULE_TAGS: This specifies a tag, such as eng, and the system will include this module in every build that will target the eng type as TARGET_BUILD_VARIANT.
- LOCAL_MODULE_PATH: This specifies a custom installation path to override the one specified in the BUILD_ template.
- LOCAL_CC: This specifies a different C compiler to be used.
- LOCAL_CXX: This specifies a different C++ compiler to be used.
- LOCAL_CFLAGS: This helps to add mode flags to the C compiler command line.
- LOCAL_CPPFLAGS: This helps to add mode flags to the C++ compiler command line.
- LOCAL_CPP_EXTENSION: This specifies a custom extension for C++ files, if for some reason the actual extension is not .cpp.
- LOCAL_C_INCLUDE: This specifies the path for custom C header files needed to build the module.
- LOCAL_LDFLAGS: This helps to add mode flags to the linker command line.
- LOCAL_PREBUILT_EXECUTABLES: During the creation of a BUILD_PREBUILD kind of module, this variable will contain every binary executable that will be part of the final system image. We are going to learn more about this in the next chapters.
- LOCAL_PREBUILT_LIBS: During the creation of a BUILD_PREBUILD kind of module, this variable will contain every library that will be part of the final system image.
- LOCAL_PREBUILT_PACKAGE: During the creation of a BUILD_PREBUILD kind of module, this variable will contain every prebuild APK that will be part of the final system image.
The BUILD_ variables
The following list contains the most common BUILD_ variables available during the development of a custom module:
- BUILD_EXECUTABLE: When necessary to build using native C/C++ code, we can add this line to our configuration:
- include $(BUILD_EXECUTABLE)
- BUILD_PREBUILT: This allows us to add binary components to our final image.
- BUILD_MULTI_PREBUILT: This allows us to create modules that inject the final image with binarie components of the same category. It's usually used with LOCAL_MODULE_CLASS to specify the class and the position to place the binary files.
- BUILD_PACKAGE: This allows us to create modules that generate APK files.
- BUILD_SHARED_LIBRARY: This allows us to create modules that generate shared library files.
- BUILD_STATIC_LIBRARY: This allows us to create modules that generate static library files.
- BUILD_JAVA_LIBRARY: This allows us to create modules that generate Java library files.
Android tools
Logcat
Test different log cat messages
logcat -v time -d | grep main
logcat -b events -v time -d | grep main
dmesg | grep kernel
logcat -v time -b radio -d | grep modem
LAST_KMSG = "/proc/last_kmsg
AUDIT_LOG = "/data/misc/audit/audit.log";
echo "Dumping dmesg..."
adb shell dmesg > dmesg.log
adb shell cat /proc/kmsg >> dmesg.log
echo "Dumping logcat..."
adb logcat -v time -d >logcat.log
echo "Dumping radio..."
adb logcat -v time -d -b radio >logcat_radio.log
echo "Dumping events..."
adb logcat -v time -d -b events >logcat_events.log
echo "Dumping states..."
adb shell dumpstate /proc/self/fd/0 > dumpstate.log
echo "Dumping app..."
adb shell dumpsys > dumpsys.log
echo "Dumping processes..."
adb shell ps -x > processes.log
Fastboot
Fastboot is the tool that Android gives us to manipulate the device Flash Memory and its partitions, using a computer and an USB connection.
Fastboot does not communicate with the Android system. It communicates with a specific firmware able to interact in a minimal system environment: bootloader mode.
- flash: This option is used to deploy a new binary system image from the host computer to the device partitions
- erase: This option is used to delete a specific partition
- reboot: This option is used to reboot the device in one of the available booting modes: recovery, bootloader, or standard
- format: This option is used to format a specific partition
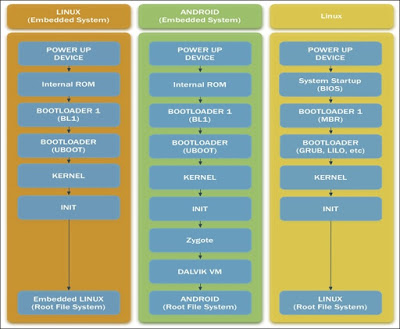
Android boot sequence
The Android boot sequence is similar to any other embedded system based on Linux: in a very abstract way, after the power-on, the system initializes the hardware, loads the kernel, and finally the Android framework.
Internal ROM – bios
When you press the power button on your device, the system loads a tiny amount of code, stored inside a ROM memory. This software is in charge of setting up all the parameters for CPU clock and running the RAM memory check. After this, the system loads the bootloader into memory and launches it.
An overview of bootloader
The bootloader is in charge of loading the system kernel into the RAM memory and launching it, to continue the boot sequence.
The most popular bootloader software for Android devices is U-Boot, the Universal Bootloader. U-Boot is widely used in all kinds of embedded systems: DSL routers, smart TVs, infotainment systems, for example. U-boot is open source software and its flexibility to be customized for any device is definitely one of the reasons for its popularity. U-boot's main task is to read the kernel image from the boot partition, load it into the RAM memory, and run it. From this moment on, the kernel is in charge of finishing the boot sequence.
The kernel
After the bootloader loads the kernel, the kernel's first task is to initialize the hardware. With all the necessary hardware properly set up, the kernel mounts the ramdisk from boot.imgand launches init.
The Init process
In a standard Linux system, the init process takes care of starting all the core services needed to boot the system. The final goal is to complete the boot sequence and start the graphical interface or the command line to make the system available to the user. This whole process is based on a specific sequence of system scripts, executed in a rigorous order to assure system integrity and proper configuration.
The Android init process consists of two main files:
- init.rc
- init.${ro.hardware}.rc
The init.rc file is the first initialization script of the system. It takes care of initializing those aspects that are common to all Android systems. The second file is very hardware specific. As you can guess, ${ro.hardware} is a placeholder for the reference of a particular hardware where the boot sequence is happening.
Android systems use a different language to deal with the initialization sequence: Android Init Language.
The Android Init Language is based on five classes of statements:
- Actions
- Commands
- Services
- Options
- Imports
ACTIONS
An Action is a sequence of commands bound to a specific trigger that's used to execute the particular action at a specific moment. When the desired event happens, the Action is placed in an execution queue, ready to be performed.
This snippet shows an example of an Action statement:
on <trigger> [&& <trigger>]*
<command>
SERVICES
Services are programs that the init sequence will execute during the boot. These services can also be monitored and restarted if it's mandatory they stay up. The following snippet shows an example of a service statement:
service <name> <pathname> [ <argument> ]*
<option>
OPTIONS
Options statements are coupled with services. They are meant to influence how and when init manages a specific service.
TRIGGERS
Triggers specify a condition that has to be satisfied to execute a particular action. They can be event triggers or property triggers. Event triggers can be fired by the trigger command or by the QueueEventTrigger() function.
COMMANDS
The Command statement specifies a command that can be executed during the boot sequence, placing it in the init.rc file.IMPORTS
Imports specify all the external files that are needed in the current file and imports them:
import <path>
Android recovery
As we know, the so-called Recovery is a minimal runtime system, completely decoupled from the main Android system and totally self-sufficient. Its main goal is to guarantee system integrity and provide the necessary tools to fix common minor issues and restore a properly working system.
With an Android vanilla Recovery, we can:
- Update the Android system
- Wipe the data partition and the cache partition
· The Android Recovery system is completely standalone. This means that whatever might happen to the main Android system, recovery will be always able to restore a working system.
· To achieve this level of resilience, recovery contains its own Linux kernel and its own rootfs.
The Android Recovery system is completely standalone. This means that whatever might happen to the main Android system, recovery will be always able to restore a working system.
To achieve this level of resilience, recovery contains its own Linux kernel and its own rootfs.
Recovery mode can be accessed with a button combination when the device is turned off. The options you will find in the recovery menu could vary, but an Android vanilla recoverywill definitely provide these options:
- Reboot system now: This option will restart the system.
- Apply update from ADB: Android Debug Bridge can be used from a host computer to upload an official Google system update. Only certified updates can be uploaded and applied this way due to security measures enforced by the recovery to guarantee system integrity.
- Wipe cache partition: This option will erase the cache partition. This partition usually contains the system's temporary data and app cache data. Deleting this file will free quite an amount of disk space, without losing user data or apps.
- Wipe data/factory reset: This option will erase the volatile memory and restore the original factory system. Everything that is not strictly system-related will be deleted: videos, music, documents, user apps, and so on. The cache partition will be erased as well.
The most popular recovery alternatives are:
- Clockworkmod
- 4EXT
- Amon Ra Recovery
- Team Win Recovery Project (TWRP)
Adding a custom init sequence
This system folder contains a collection of scripts that can be executed during system startup. To achieve the same behavior on Android, we can use busybox and its run-parts utility.
For instance, the following command will execute every script contained in the /system/etc/init.d folder:
run-parts /system/etc/init.d
Now that you have a collection of ordered scripts and you know how to execute them one by one, you need to edit the install-recovery.shfile we saw in the previous chapters and add the following line:
run-parts /system/etc/init.d